This comprehensive guide walks you through professional marble restoration—helping you understand when your floors need it, exactly what the process involves, what to budget, and how to maximize years between restorations.
Advantage Cleaning provides commercial cleaning, floor cleaning, and professional marble floor cleaning and restoration services for commercial facilities in New York, New Jersey, and Connecticut. We share our expertise with facility leaders to help elevate the consistent high-quality services that we are recognized for by our customers.
When Your Marble Floor Needs Restoration
You walk into your building lobby on Monday morning, and something feels off. The marble floor that once gleamed now looks tired and dull. Coffee stains that won’t come out dot the entrance. Scratches catch the light in ways they shouldn’t. Your cleaning crew works harder than ever, but the floor looks worse every month. Delaying restoration can lead to future damage that is more costly to repair, as stains, spills, and wear accumulate over time.
Here’s the truth facility managers need to hear: No amount of cleaning will fix a damaged marble floor.
Etch marks are physical damage, not stains—no cleaning product on Earth can repair them. The acid has literally eaten into your marble. Those scratches? They’re carved into the stone. That dullness? The surface is physically worn away.
This is when you need restoration, not cleaning.
We have restored marble floors in some of New York’s most prestigious buildings—from historic Art Deco lobbies to modern glass towers. I’ve seen $500,000 lobby floors that looked like parking garage concrete. And we have helped bring them back to showroom condition, bringing new life to marble floors by restoring their original beauty and vitality. This guide explains exactly how marble restoration works, when you need it, what it costs, and what results to expect.
The Business Impact Test
Questions:
- Are maintenance costs increasing? Damaged marble takes more time and more product to clean. If your cleaning costs keep rising but results keep getting worse, restoration will actually save money long-term.
- Are you getting complaints? When tenants, clients, or visitors comment on floor appearance, it’s affecting your property value and business reputation.
- Is your Class A building looking like Class B? First impressions matter in competitive NYC real estate markets. Your lobby floor is often the first thing people see.
- Are you preparing for lease-up or sale? Restoring marble before marketing a property provides significant ROI and increases the aesthetic value, making the space more visually appealing and attractive to potential tenants or buyers.
You May Need Professional Marble Restoration If Your Marble Floor Have:
- Dullness that cleaning can’t fix—especially in traffic lanes
- Fine scratches from constant foot traffic that rob the stone of its natural reflective shine
- Etch marks (dull spots) from acidic spills that won’t polish out
- Rough texture where the surface should feel smooth
- Tiles at different heights creating trip hazards
- Chipped tiles or edges that detract from the stone’s appearance
- Stains that won’t come out after multiple professional treatments
What restoration can actually fix:
- Widespread scratching and wear patterns
- Etching from acids (coffee, cleaning products, wine)
- Lost shine and dullness
- Surface unevenness (lippage)
- Deep stains embedded in the stone
- Years of accumulated damage
- Chips and small tears in the stone
Damaged areas, including chips, cracks, and tears, can be seamlessly repaired to restore the floor’s original appearance.
Let me walk you through exactly how this process works.
The Difference: Marble Restoration vs. Cleaning
I get calls every week from facility managers who think they need “deep cleaning” when they actually need restoration. Or vice versa. Understanding the difference between marble floor cleaning and restoration saves you thousands of dollars and weeks of confusion.
Professional marble restoration companies offer tailored solutions to address a wide range of marble floor issues, using expert-driven methods to restore, clean, and protect natural stone surfaces.
These services are designed to restore and preserve the beauty of marble floors in both commercial and residential settings.
Table: the difference between marble restoration vs. cleaning
| Factor | Cleaning | Restoration |
|---|---|---|
| What It Does | Removes dirt, grime, oils | Physically removes damaged marble surface |
| How It Works | Uses chemicals and poultices | Uses diamond abrasives (like sandpaper for stone) |
| What It Fixes | Treats stains | Fixes scratches and etching |
| Surface Impact | Maintains existing surface | Creates entirely new polished surface |
| Frequency | Done monthly or quarterly | Done every 5-15 years |
| Cost Range | $0.50-$2 per sq ft | $3-$8 per sq ft |
Think of it this way: Cleaning is like washing your car. Restoration is like taking it to the body shop to fix dents and repaint. Both are necessary, but they solve completely different problems.
Cleaning can treat surface stains, but only restoration can address physical damage to the stone. Professional marble restoration addresses etched surfaces, cracked stone, and faded marble floors using proven techniques with specialized tools. We’re not cleaning your floor—we’re rebuilding its surface.
What Restoration Cannot Fix
Before you get too excited, restoration has limits:
Color Changes from UV Damage
Prolonged exposure to direct sunlight allows UV radiation to penetrate the marble surface, breaking down chemical bonds responsible for color on all floor types.
If sunlight has yellowed your white marble or faded colored marble, restoration can make it shiny but cannot restore the original color. The color change goes deeper than we can safely grind.
Deep Structural Cracks
Hairline cracks can sometimes be filled and polished over. But cracks that go completely through the tile? Those need repair or replacement before restoration.
Ongoing Water Problems
If you have water seeping up from below, creating constant staining and efflorescence (that white crusty stuff), fix the moisture problem first. Otherwise, we restore your floor beautifully, and the stains come right back.
Wrong Marble Choice – Learn the difference between cleaning and sanitizing to ensure you’re using the best care methods for your marble surfaces.
Some marble simply isn’t suitable for high-traffic commercial floors—especially in New York’s demanding environments where building lobbies see thousands of visitors daily. If your marble is too soft or too prone to problems, restoration might be a temporary fix. We’ll be honest with you if replacement makes more sense. Similar restoration techniques can also be applied to other surfaces such as limestone, granite, and terrazzo.
How to Know If Your Marble Floor Needs Restoration
Let me share the signs I look for when I walk into a building. These signs can appear on all marble surfaces, including floors, countertops, and walls.
The Visual Test
Look at Your Traffic Patterns
Stand at your building entrance. Look down the main path to the elevators. Do you see a dull track where everyone walks? Marble can lose its shine over time due to foot traffic, dirt, and other factors.
If your cleaning crew just finished, and you can still see exactly where people walk, that’s wear—not dirt.
Check the Lighting
Marble should reflect light clearly when it’s in good condition. If your floor looks hazy or milky even when clean, the surface is damaged.
Walk around and look at the floor from different angles, examining it in detail to spot subtle signs of damage that might otherwise be missed. Do you see:
- Dull spots that look like water stains? (Usually etching from acids)
- Scratches that catch the light?
- Areas that look cloudy no matter how much you clean?
The Etch Mark Test
Etch marks are dull spots where acid has reacted with calcium carbonate and literally eaten away a tiny bit of the surface.
They look like rings or spots—often near coffee stations, water fountains, or anywhere food and drinks are common. These cannot be cleaned away because the marble surface is gone in those spots.
The Touch Test
Run your hand across your marble floor in different areas:
What You Should Feel: Smooth, glassy surface—almost slippery to touch
What Indicates You Need Restoration:
- Rough texture (even slightly rough means damage)
- Uneven surface heights between tiles
- If the damaged area is noticeably rough to touch, it’s severe etching
Your fingers are incredibly sensitive. If the marble doesn’t feel perfectly smooth, it’s damaged.
The Cleaning Test
This one’s simple: If cleaning doesn’t make it look better, you need restoration.
Your cleaning crew finishes, and the floor still looks:
- Dull in traffic areas
- Stained despite proper stain removal attempts
- Scratched and worn
- Generally “tired” looking
That’s not a cleaning problem. That’s physical damage to the marble surface.
The Marble Restoration Process: What Actually Happens to Your Floor
Let me walk you through exactly what we do during marble restoration. Successful marble restoration requires expertise and the right supplies to ensure the best possible outcome. I’ll explain each step in plain English, so you know what you’re paying for, and why each step is essential for achieving the best results.
Progressive Diamond Abrasives
Marble restoration uses industrial diamond pads—essentially very aggressive sandpaper for stone. We start with coarse grits that remove damaged marble, then progressively use finer grits until we achieve a mirror polish.
Think of refinishing a wood floor: Remove the damaged surface, smooth it progressively, then apply finish. Same concept, but we’re working with stone instead of wood.
The Four Main Steps:
- Grinding – Remove the damaged surface layer
- Honing – Smooth the surface progressively
- Polishing – Create the shine and clarity
- Sealing – Protect the new surface
Each step requires different equipment, different diamond grits, and different techniques. You cannot skip steps—trying to polish without proper honing creates a hazy, unclear finish.
Step 1: Grinding – Getting Down to Good Marble
What We’re Doing:
This step removes all ledges, roughness, and brings flatness to marble floors; it can remove the deepest scratches and stains.
We’re physically grinding away the damaged surface layer using very coarse diamond pads (30-50 grit—that’s aggressive). This removes:
- Deep scratches that have been there for years
- Severe etching from acids
- Stains that have penetrated the surface
- Uneven tile heights (called lippage)
The Lippage Problem:
Lippage is the high edges and scratches found in marble; even newly installed marble floors can have some tiles higher or lower than floor flatness.
You’ve probably felt this—walking across tile and feeling one higher than the next. It’s often from poor installation, but sometimes from building settlement. Grinding removes the high spots and creates a perfectly flat surface.
What It Looks Like:
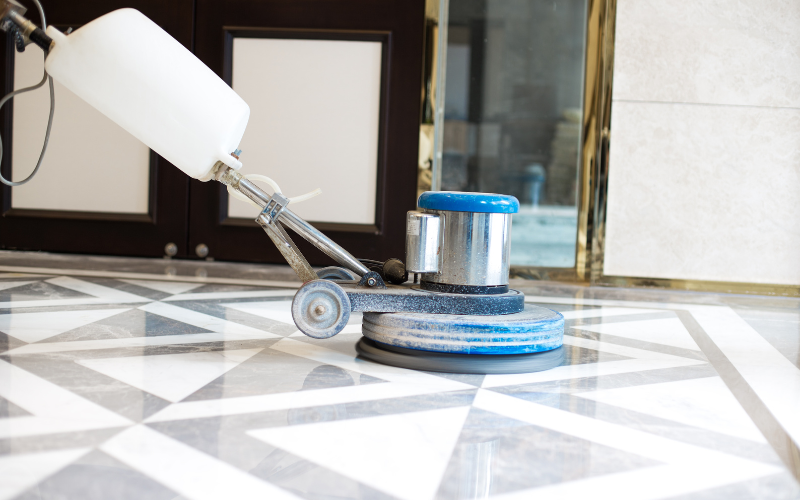
We use a heavy machine (looks like a floor buffer but weighs 175 pounds) with diamond pads attached. Water constantly flows onto the floor—this lubricates the diamonds, cools the marble, and controls dust. A wet vacuum follows behind, sucking up the slurry (mixture of water and ground marble).
The floor looks worse before it looks better. After grinding, you’ll see a uniform matte surface with no shine—that’s exactly what we want.
Critical Point:
Watch out for over-cutting lippage; too high lippage may crack stone at high speed.
This is why hiring experienced professionals matters. Grinding removes marble permanently—we need to know exactly how much to remove without damaging tiles. Most marble floor tiles are 3/8 to 3/4 inch thick, giving us room for multiple restorations over their lifetime, but you can’t just grind recklessly.
How Much Marble Gets Removed
| Type of Grinding | Depth Removed | Purpose |
|---|---|---|
| Light grinding | 1/64 inch (0.4mm) | Minor scratches, light etching |
| Standard grinding | 1/32 inch (0.8mm) | Typical wear, moderate damage |
| Heavy grinding | 1/16 inch (1.6mm) | Severe lippage, deep stains, and other issues can often be addressed through proper building maintenance services. |
For perspective, a credit card is about 1/32 inch thick. We’re typically removing that much or less.
Step 2: Honing – Creating Smoothness
What We’re Doing:
Honing brings smoothness by removing scratch marks using diamond floor polishing pads in lower grits.
After grinding, your floor is flat but covered in grinding marks (like sanding marks on wood). Honing progressively smooths these out using medium-grit diamond pads.
The Three Honing Passes:
We go through three grits in sequence—you cannot skip any:
100 Grit – Removing Grinding Marks
This removes the scratches from the 30-50 grit grinding. The floor starts looking more uniform but still has no shine. It’s like going from rough sandpaper to medium sandpaper on wood.
200 Grit – Further Refinement
Now we’re removing the 100 grit scratches. The surface is getting smoother—you can feel the difference when you touch it. Still no shine, but the texture is much finer.
400 Grit – Final Honing
This is the last honing step. Apart from scratches, honing also removes stains and gives a more uniform appearance. The floor feels smooth to touch now. Some people actually stop here if they want a matte finish (common in some commercial applications for slip resistance).
Why Each Step Matters:
Imagine trying to jump from 30 grit straight to 800 grit. The 800 grit pad cannot remove 30 grit scratches—it’s not aggressive enough. You’d end up with deep scratches still visible under a partial polish. The result would look hazy and uneven.
Each grit level removes scratches from the previous level. Skip a step, and you’ll see it in the final result.
What You’ll Notice:
Between each honing step, we rinse the floor completely and extract all the slurry. This prevents contamination—tiny particles of coarse grit will scratch your floor when we’re using fine grit.
The floor transforms from flat-but-rough to flat-and-smooth through these three passes. You’re seeing the marble emerge from under years of damage. These steps are essential for restoring the marble’s original luster, bringing back its desirable shine and elegance.
Step 3: Polishing – Bringing Back the Shine
What We’re Doing:
Polishing is done with diamond floor pads with grit 800 and 1500, gently polishing with fine grit until it sparkles.
Now we create the shine. Fine-grit diamond pads (800, 1500, and 3000) progressively polish the smooth marble surface until it reflects light clearly. This process restores the elegance and glory of your marble floors, bringing back their original, magnificent appearance.
The Three Polishing Levels:
800 Grit – Initial Polish
The floor starts showing reflections for the first time. It’s not mirror-bright yet, but you can see reflections of lights and objects. The marble’s natural colors and veining start becoming more vibrant.
1500 Grit – Medium Gloss
Now we’re getting somewhere. Fine grit (1500-3000) is used for final polishing stages, giving marble a glossy, smooth finish. Clear reflections are visible. The surface feels glass-smooth. Many commercial applications stop here—it’s shiny enough to look great but easier to maintain than mirror finish.
3000 Grit – High Gloss
This is what people expect from marble—mirror-like reflections, maximum clarity and depth, that “wet look” appearance that makes marble special.
Choosing your finish quality level
Not everyone wants maximum shine. Here are your options:
| Finish Type | Stop At | Appearance | Best For | Maintenance |
|---|---|---|---|---|
| Honed/Matte | 400 grit | No shine, soft look | High-traffic areas, slip concerns | Lowest |
| Semi-Gloss | 1500 grit | Soft shine, some reflection | Busy commercial spaces | Medium |
| High-Gloss | 3000 grit | Mirror shine, clear reflection | Lobbies, formal areas | Higher |
| Mirror Polish | 3000 + buffing | Maximum “wet look” | Luxury applications | Highest |
Most Class A office buildings choose semi-gloss (1500) for practical reasons. It looks professional, maintains easier, and doesn’t show every footprint like mirror polish does.
Luxury hotels and high-end residential often go full mirror finish—it’s stunning but requires more frequent maintenance.
The Polishing Difference:
At this stage, we use less water than during grinding and honing. Too much water actually reduces polishing effectiveness at fine grits. Machine speed also changes—slower RPM for finer polishing work. For more suggestions on avoiding common mistakes in floor care, especially when stripping and waxing, see these professional tips.
Your marble’s natural beauty emerges completely during polishing. Colors deepen, veining becomes pronounced, and you see why people choose marble in the first place.
Optional: Crystallization for Extra Durability
What is crystallization?
Crystallization involves spraying liquid onto the marble surface and buffing with steel wool fitted under a single disc floor machine, creating a chemical reaction with long-term impact on stone durability.
In plain English: It’s a chemical process that hardens the marble surface and intensifies the shine. The crystallizer reacts with calcium in the marble to form a thin, glass-hard layer on top.
Benefits:
- Even deeper shine than 3000 grit alone
- Harder, more scratch-resistant surface
- Better stain protection
- Can extend time between full restorations
When crystallization is recommended:
| When we recommend it | When we do not recommend it |
| High-traffic commercial lobbies | If you chose matte/honed finish (defeats the purpose) |
| Areas where maximum durability needed | Budget-conscious projects (adds cost) |
| When you want the absolute best appearance | Areas where slip resistance is primary concern |
| If you’re trying to maximize time until next restoration | It’s optional but makes a real difference in high-traffic Class A buildings. |
Step 4: Sealing – Protecting Your Investment
The Critical Final Step:
Sealing the polished marble floor with a high quality sealer is crucial to prevent water absorption and ensure long-lasting protection.
Think of sealing like this: We just spent days creating a perfect surface. Sealing with a high quality sealer creates a protective barrier that shields the marble from stains, spills, and everyday wear, making it easier to clean. Without sealing, you’ll see stains appearing within weeks.
Important Truth:
Applying marble sealer does NOT prevent etching; sealers prevent stains but cannot stop physical damage to the stone.
Let me be clear: Sealer is not armor. It prevents liquids from soaking in and staining. It does NOT prevent acids from etching the surface. If someone spills lemon juice on sealed marble, it will still etch—but it won’t stain.
How We Apply It:
- Wait until the floor is completely dry (usually next day after polishing)
- Pour sealer and spread evenly across the marble
- Let it soak in (5-15 minutes depending on product)
- Wipe away any excess that didn’t absorb
- Apply second coat if needed
- Wait 24 hours for sealer cure before traffic
Testing the Seal:
Test with water bead test: if water absorbs quickly or darkens marble, it’s time to reseal.
When properly sealed, water beads up on the surface and sits there for several minutes. If water soaks in immediately, the seal isn’t working.
How Long Does Sealing Last:
Depends on traffic and cleaning:
- Low-traffic areas: 12-18 months
- Medium-traffic: 8-12 months
- High-traffic: 6-8 months
- In high-exposure areas, resealing every 3-6 months may be necessary
Regular maintenance is essential to preserve the floor’s appearance and to maintain the protective barrier provided by the sealer.
You don’t need full restoration when sealer wears off—just reapply sealer. We’re talking about $0.25-0.50 per square foot for resealing vs. $3-8 for full restoration.
How Long Does Marble Floor Restoration Take?
Let me give you realistic timelines so you can plan properly.
Typical Project: 1,000 Square Feet
| Day | Work Performed | Hours | Can Use Floor? |
|---|---|---|---|
| Day 1 | Grinding and honing (all grits) | 8-12 hours | No |
| Day 2 | Polishing (all grits) | 6-9 hours | No |
| Day 3 | Sealing + cure time | 3 hours + 24 hour cure | No until cured |
| Total | Complete restoration | 2-3 days | After Day 3 |
That’s for straightforward restoration of a relatively simple space.
What Makes Projects Take Longer
- Severe Damage: If your marble is badly damaged—deep stains, heavy lippage, years of neglect—we might need extra grinding passes. This can add 25-50% to timeline.
- Complex Spaces: Spaces with columns, built-in planters, multiple door ways and corners can take up to 50% longer because of additional hand work around obstacles.
- Building Occupancy: Vacant vs occupied buildings makes a difference in how efficient work can be done.
- Furniture: If the furniture has been removed when we arrive, it will not affect the time and efficiency of planned work.
Special Situations: When Marble Restoration Gets Complicated
Not every marble floor restoration is straightforward. Let me explain some challenging scenarios.
Similar restoration techniques can also be used for marble countertops, ensuring they are cleaned, polished, sealed, and protected just like marble floors.
Severe Etching
Understanding Etch Severity:
- Mild Etching: Mild etching appears as dull or light-colored chalky spots that can only be seen at certain angles. You can often fix this with marble polishing powder—doesn’t require full restoration.
- Severe Etching: Severe etching occurs if acidic substances sit for extended periods; if the area is noticeably rough to touch, it’s severe. This needs professional marble restoration. The acid ate deep enough that polishing powder won’t work.
Deep Stains: When Cleaning Fails
Some stains simply cannot be removed with poultices, no matter how good your cleaning company is.
When Grinding Is the Answer:
Grinding can remove the deepest scratches and stains.
If a stain has been there for years, it may have penetrated 1/32 inch or more into the marble. Poultices work from the surface—they can only draw out stains from so deep. Eventually, you need to grind away the stained marble.
The Rust Problem:
Rust is special because it can come from inside the marble itself.
Marble contains the mineral iron sulfide (pyrite) that can develop orange-like rust stains naturally.
Iron diffusion in marble depends on structural characteristics and stone porosity, with iron replacing dissolved calcite and moving through grain boundaries.
What This Means for You:
If rust stains keep coming back even after professional treatment, the iron is inside the marble, not from external metal objects. Grinding removes the visible rust, but iron remains deeper in the stone. The stains may eventually return.
Best Approach:
- Try specialized rust removal first
- A highly efficient method for cleaning rust stains uses chelating amino acid cysteine in a Laponite poultice combined with sodium dithionite
- If that doesn’t work, restoration with grinding
- High-quality sealing after restoration to minimize moisture (reduces future rust)
- Realistic expectations—some rust may return over time
I always tell clients the truth about internal rust. Better to know upfront than be surprised when stains reappear three years later.
Lippage: The Trip Hazard Problem
What is lippage?
Lippage is the high edges and scratches found in tiled floors, including marble tiles; even newly installed marble floors can have some tiles higher or lower than floor flatness.
You walk across your floor and feel one tile higher than the next. Or you see edges catching the light where tiles aren’t level. Sometimes it’s subtle, sometimes it’s a genuine trip hazard.
What causes lippage?
- Poor installation (most common—installer didn’t level properly)
- Building settlement after installation
- Substrate problems
- Natural stone thickness variations not compensated during install
Why It Matters Beyond Aesthetics:
- Liability: Trip hazard means injury risk means lawsuit exposure
- Cleaning nightmare: Edges collect dirt and grime
- Uneven wear: High tiles wear faster, creating more obvious height differences over time
- Professional appearance: Tells visitors your building isn’t maintained well
The Restoration Solution:
Grinding levels everything. We grind down the high spots until the entire floor is perfectly flat. Watch out for over-cutting lippage; too high lippage may crack stone at high speed—this is why experience matters.
Important Limitation:
We can only grind down, not build up. The final floor height will be at the level of the lowest tile. If you have significant lippage (1/4 inch or more), this might be noticeable at walls or thresholds.
Extreme Lippage:
If lippage exceeds 3/8 inch, grinding may not be viable. We’d need to remove too much marble, potentially exposing the substrate or making tiles too thin. At that point, replacement might be the better option.
Ready to Restore Your Marble Floor?
If your marble floor shows signs of wear, etching, or has lost its shine, professional restoration can bring it back to showroom condition. At Advantage Cleaning, we specialize in high-quality marble floor restoration services for commercial properties across New York City, including Manhattan, Brooklyn, Queens, the Bronx, and Staten Island.
Our engineered restoration process uses progressive diamond abrasive techniques to remove damage, create perfectly smooth surfaces, and deliver the mirror-bright finish your facility deserves. We work with facility directors who need predictable results, audit-ready documentation, and minimal disruption to building operations.

A higher grade of Quality in Commercial Floor Cleaning
Marble Floor Restoration FAQ
Relevant articles
Cleaning Marble Floors – Guide for NYC Commercial Facility Managers
This article focus on professional marble floor cleaning protocols for commercial properties. pH-neutral marble floor…
Preventing Mistakes When Stripping & Waxing Floors – Pro Tips
Stripping and waxing floors is an essential part of floor cleaning and maintaining a clean,…

How to Strip and Wax a Floor – Step-by-Step Guide by Professionals
Stripping and waxing floors is not just about cleaning the floor but about creating a…
